• Decor & Design
  • DIY
  • Guide
  • Home Improvement
  • Smart Home
DormyHome
keep your memories alive
Home » Guide
Category:

Guide

Sherwin Williams Gauntlet Gray SW 7019
PaintsGuide

An Ultimate Review of Sherwin-Williams Gauntlet Gray 7019

by Tyler Hernandez August 17, 2023
written by Tyler Hernandez

Don’t you think in the vast pallet of possibilities, there is an amazing and beautiful shade of gray that is a statement of elegance and class? Yes, you heard it right. Sherwin-Williams gauntlet gray SW7019 is a captivating shade that can make people embrace any room with beauty.

This color can adapt to its surroundings, seamlessly merging with both traditions and modern aesthetics. Its rich and deep tones create a sense of depth and dimension, elevating the vibe of the room. Gauntlet gray has the power to positively affect your brain and instantly bring you to a premium place.

We have done a thorough review of this color, making sure to analyze the pros and cons before applying this shade to your room.

What Is Sherwin-Williams Gauntlet Gray?

Sherwin-Williams Gauntlet gray SW 7019 is a popular paint color with a subtle and classy feel. The beauty of this gray comes from its relation to the cool gray family having a blue undertone. This sophisticated color is preferred by many for decorating their homes. Surprisingly it’s a great color for both indoors and outdoors. Making it a great option for people looking to redo their home and don’t have enough time to spend on deciding color schemes.

Gauntlet is known for its calming and peaceful nature, creating a sense of stability and balance. People usually associate this color with a premium feel. However, the beauty of this color lies in the surroundings as well; you need to take care of the lighting to make sure it looks good. If you keep the lighting dark, then it’s sure to come out the worst experience for you.

Why Choose Gauntlet Gray?

Many interior designers are in love with this color due to its versatile shade that can be used on walls, tables, indoors, outdoors, and everywhere you can think of.

So, here we have curated a few reasons why you should opt for gauntlet gray for your next project.

1. Classic & Timeless

Classic & Timeless

Gauntlet Gray is a classic and timeless color that has been popular for decades. It has a beautiful subtle warmth that magically adds depth and dimensions to any space. The amazing part is it can be paired with a wide variety of colors and lighting tones.

2. Neutral Yet Bold

 Neutral Yet Bold

While it is a neutral color, it still has enough depth and intensity to make a statement. It is a bold color choice that can add drama to your room without being too cliche or dramatic.

3. Complements Other Colors

Complements Other Colors

Sherwin-Williams gauntlet gray SW 7019 is an amazing base color that compliments other shades. It goes well with shades like crisp white, creams, and even deep blue and greens. Gauntlet gray even works well with a variety of designs and styles, so what’s stopping you from trying it?

Understanding the Color Psychology of Gauntlet Gray

Understanding the Color Psychology of Gauntlet Gray

Colors have a great impact on our mood and behavior, and hence it becomes really important to choose the right colors for our home. Before we choose any color for our homes and living spaces, we must understand what kind of impact they will have on us. If we talk about the Sherwin-Williams gauntlet gray SW 7019, it is a color that evokes calmness and tranquility. It’s a shade of gray with a hint of blue, making it the perfect shade for your bedroom and even bathrooms, where relaxation is the key.

Gray is a shade that is associated with intelligence, balance, and association, and hence you will find many business people wearing gray suits or coats. Hence if you choose to have Gauntlet gray at your home, it could have a great impact on your personality and mood whenever you come back home.

Complementary Colors with Gauntlet Gray

No doubt, gauntlet gray is a versatile color, so the list of complementary colors could go long, but we have selected the best combinations for you so you don’t have to go through the struggle of mixing and matching.

Have a look.

1. Navy Blue

Navy Blue

The cool undertone of navy blue contrasts beautifully with warm tones of gauntlet gray, creating a balanced and timeless look.

2. Pale Pink

Pale Pink

Pairing the gauntlet Gray with pale pink creates a sophisticated and feminine feel. The softness of pink offsets the darker tones of the gray, resulting in a beautifully harmonious and calming effect.

3. Mustard Yellow

Mustard Yellow

The warmth of mustard yellow works pretty well with the warm tones of gauntlet gray. This killer combination can create a very welcoming and inviting atmosphere. These shades can bring a great vibe to your living space.

4. Olive Green

Olive Green

This earthy green color pairs perfectly with the natural and grounding tone of gauntlet gray. This could result in a very calming and serene vibe; make sure you utilize this combination for a space where relaxation is your goal.

Pros & Cons of Sherwin-Williams Gauntlet Gray

Like all paints, gauntlet gray also has its pros and cons. Check out the lists to get more clarity before choosing the shade.

Pros

  • Gauntlet gray is a shade that can be used in a variety of ways, indoors or outdoors. You can use it to create an accent wall, a bathroom or bedroom, and whatever comes to your creative mind.
  • It is a very calming and relaxing color that will help you create a relaxing and productive environment. Hence this color could be used in bedrooms and even office spaces.
  • As mentioned above, it is a very neutral color that can be paired with a variety of shades, creating different vibes. Combining it with shades of cream creates a very luxurious kind of effect.
  • Gauntlet Gray is a pretty durable color that can easily withstand wear and tear. Making it a great choice for areas such as bathrooms and even cafes or high-traffic areas.
  • Finally, it’s a low-maintenance shade. You will not have to stress about cleaning as it’s already dark and hence easy to clean. Busy people, that’s a great one for you.

Cons

  • Gauntlet gray is a pretty dark color so it can be a dark shade for some people. However, you can always lighten it by combining it with lighter shades such as white, cream, or baby pink.
  • For people who are very vibrant in personality, gauntlet gray is a very neutral color, and they consider it boring. So, if you want to add this shade to your space, make sure to do your research and pair it with vibrant things that make your personality.
  • It may be difficult to find the exact gauntlet gray shade. It comes in various shades, and choosing the best one from it is a real challenge. This is where most people just give up.
  • It is a very premium paint color and hence is very expensive, as compared to most paints available in the market. But remember, it also has a quality that no other paint provides.
  • Gauntlet gray is a dark shade, so it can be difficult to apply evenly and sometimes can get darker if you apply too many coats just to match the shade. Make sure you paint carefully whenever using gauntlet gray.

Conclusion

All in all, sherwin-williams gauntlet gray SW7019 is a stunning color option that will help to enhance the appearance of any space. It is a preferred option for homeowners due to its adaptability and capacity to be combined with various shades. According to color psychology, Gauntlet gray is a very intelligent and sophisticated color that depicts class and elegance.

Make sure to test this color in various lighting and various shades to make sure your house has the best combination. The drawback could be a dark room overall, so checking the lighting is a must.

Frequently Asked Questions

What is the Undertone of Gauntlet Gray?

Gauntlet gray is a sophisticated and string color with a versatile undertone. It has a subtle warmth that adds a premium feel to any space it is applied to. The undertone strikes a perfect balance of peace and tranquility.

What Colors Go Well with Gauntlet Gray?

It can be paired with a variety of colors, creating amazing combinations. For a sophisticated and classy look, pair it with tones of white or cream. To add depth, pair it with deep blue and green.

Is Gauntlet Gray a Warm or Cool Color?

Gauntlet gray leans towards being a warm shade of grey. It has a subtle hint of warmth in its undertone. However, it even has a pinch of cool touch to it, and that’s the reason that makes it such a b beautiful color to op for.

What Is Gauntlet Gray’s LRV?

Gauntlet Gray’s LRV stands a bit over 17, placing it in the medium-dark category, Which simply means it’s a color that is neither too dark nor too light, which makes it a perfect fit to create your dream home.

August 17, 2023 0 comments
0 FacebookTwitterPinterestEmail
The Ultimate Guide to Choosing the Right Color for Carpet 
Guide

The Ultimate Guide to Choosing the Right Color for Carpet 

by Marco Bianchi August 17, 2023
written by Marco Bianchi

Are you renovating your home and looking for carpet inspiration? When choosing a new carpet, there may be a number of questions that you have about the color and structure of your new carpet. Choosing a carpet with confidence depends on your preferences and whether they match the design of your interior or not.

With a wide range of choices for wall-to-wall carpet, this flooring can be the element that changes the mood of a house and makes it much easier to walk around. Color, padding, style, and material are often important factors to consider when investing in new colors for carpeting.

Keep reading for guidance on selecting the perfect color for carpets.

Factors to Consider Before Buying a Carpet

1. Material

Carpet-Materials

Different natural and synthetic options exist for buying new carpets, with wool, silk, cotton, and linen being common natural choices, whereas synthetic materials include nylon, olefin, polyester, acrylic, and polypropylene. Although synthetic materials such as nylon are often cheaper, considering potential allergies or sensitivities to certain materials is an important factor. Some materials offer longer lives than others and are generally more durable, such as nylon, in contrast to wool, which is extremely soft but has a higher price tag and greater chances of staining due to natural absorption tendencies and will enhance the color of your carpet.

2. Padding and Density

Padding and Density

Padding under the carpet is what ensures the soundness of the carpet itself based on the gap between the material and the floor. The padding affects how carpet under the feet, its insulation within the room, and the sound-absorbing ability of the carpet itself. Distances between the carpet fibers represent the density of the carpet, and those that are more dense have a longer life. Other factors to be considered are tuft twists which refer to how many times each tuft of fiber is twisted, and a greater number of twists often means greater durability. Lastly, face weight is a measure of the carpet weight per square yard, where some materials are heavier than others due to greater density.

3. Warranties

Warranties

Carpets have warranties as well. The durability of carpets is usually for longer periods of time, with at least 15-20 years of guaranteed quality for a number of good carpets. Decide on the carpets offering longer warranties, whether you buy online or at a store selection. Seek carpets from flooring companies ready to cover warranties for texture retention and conditions beyond product defects.

4. Carpet Color

Carpet Color

This category represents one of the larger choices in buying a new carpet and deciding on a color for carpets. For choosing the color, decide on the choices that are definitely not desired for your new carpet. Carpet sample boards may be a great way to start, often arranged by color from darker shades to lighter shades. Then, filter out those samples which are too light or dark in the desired color range. Lastly, decide on the undertones you will not consider. Comparing different samples allows you to see any undertones that exist in the carpet. Common undertones are green and pink, the latter being a greatly undesirable undertone.

Neutral Colors

Neutral colors are the most common colors for carpets and have become a regularity over time. They show durability and permanence throughout different eras and trends. They include grays, beiges, browns, and shades of blue as well. These colors will not bring substantial changes in mood and maintain a lightness around the house.

Dark Colors

The darker shades of colors can transform a room and create a personalized environment that also conceals dirt, debris, and stains in common areas. Common dark colors are blues, purples, maroons, and blacks, which may be suitable for social spaces or hallways due to their natural ability to give a clean appearance.

Light Colors

Since natural light is able to be dispersed throughout a space, light colors create a larger space in appearance and are able to brighten smaller areas such as bedrooms or nurseries. Light choices include shades of green, pink, white, beiges, or creams. However, lighter shades may not be suitable for common areas where children and pets play as stains become more visible.

Gray Colors

Gray carpet shades and tones can set a moodier design for a room, and lighter shades are often able to brighten the room up and can complement different styles as a color in between black and white, gray stands alone to create a unique atmosphere depending on the shade and brightness of the color and the general ambiance of the room. The carpet is easier to maintain since pet fur is not fully visible.

Tan and Beige Colors

This color group represents the most common colors used for home carpets. Tan, brown, and beige colors can create natural earth look for the flooring. These colors also hide pet hair or dirt, while patterns or textured carpets do not. The moderate color allows for a transitional match to furniture and other materials within a room. The color range is available in different shades and in fashion over different eras and trends.

Blue and Black Colors

Blue carpets offer saturated colors to the room and home with a classic look, especially when patterned designs or lighter shades are used. Black carpets are very suitable for modern and contemporary designs where children and pets reside due to the ease of hiding stains caused by food and paint spills.

How to Select a Carpet Sample

How to Select a Carpet Sample

Once a decision is made for a carpet sample board, the final range often offers 4-6 choices. When this stage is reached, these choices can be peeled off and labeled at the back with a pen, noting the original locations. During this process, you can eliminate the choices that will not work due to color clashes or a general lack of aesthetic value to narrow down the choice to around 3 samples. After writing down these samples, you can glue them back onto the carpet sample board. At this final stage, you can now order larger samples of these choices by asking your flooring supplier, which takes a few days at most.

Using these large samples, check out any undertones that you may have missed and how the overall texture fits in with your house and when you walk on it. Try viewing the samples under different lighting to see how they may fit the room, as the store lighting will have been different. Check out how the color of the carpets fits in with interior designs and furnishings.

Additional Conditions to Consider While Keeping It Clean

1. Pets

Pets

If you have pets, considering how they interact with different materials and move around the house is an important step. Fur may end up in between carpet fibers and cause allergies for those living at home. There is a possibility that you may need to vacuum your carpet more often for some materials than others due to the shedding and possible mud stains that pets may drag in.

2. Heating and Climatic Conditions

Heating and Climatic Conditions

For regions with warmer climates, carpets may be better in certain seasons than others. Heating carpets are also an option, as they provide extra warmth through incorporated coils for the feet during the winter. The characteristics of low power consumption and high efficiency make it a pocket-friendly option for the winter at home.

Common Carpet Materials

1. Nylon

Carpet nylon

As one of the most common materials for carpets, nylon provides durability for at least a decade and is ideal for homes with children and pets. Certain carpet labels usually have higher-quality nylon fibers, whereas lower-quality nylon is also available. The strongest and most expensive nylon type is 6.6 nylon.

2. Polyester

Polyester

As another common option, this material is cheaper at around $13 per square yard. Polyester is stain-resistant and luxurious underfoot with large color selections. The material is more suited for low-foot traffic areas, such as bedrooms, and for homes without pets or children.

3. Olefin

Olefin

Known as polypropylene, olefin is inexpensive and strong, providing resistance to fading over time. It conceals dust and stains with resistance to mildew and static. This material is ideal for busy areas of the house with kids and is available for an average of $17 per square yard.

Common Signs of Carpet Quality

Common Signs of Carpet Quality

There are certain general characteristics that can ensure a good quality carpet from the start:

  • Tuft Twists: Each carpet fiber should ideally have a greater number of twists within a one-inch length to ensure durability.
  • Density: The rating of density is based on the carpet packing, and thicker, heavier carpets last longer since they are less prone to being crushed.
  • Construction: Carpets may be labeled as Bulked Continuous Filament (BCF) or “staple.” Staple carpets tend to shed more often in the first year of installation, requiring you to vacuum more frequently till shedding stops, especially for allergy sufferers.
  • 10-Year Warranty: Carpets tend to come with 10-25 year warranties but are mainly for product defects from the manufacturing end. Look for texture retention warranties that come for longer periods.

Conclusion

All in all, new carpets are an important choice that will change the home setting and mood altogether. The colors of a carpet alter the atmosphere of a living area or room, and for that, ensuring that you make the best choice for you is important.

Choose a color for your carpet that is right for everyone at home, as it may influence both lifestyles and work over the long term. Therefore, it is important to do your research before choosing a new carpet to ensure you make the best choice in color, style, texture, and material for your rooms.

Try to consider materials suitable for everyone at home, including the elderly and pets. Durability and construction are key aspects of finding a long-lasting carpet for your home with confidence.

August 17, 2023 0 comments
0 FacebookTwitterPinterestEmail
A Complete Guide on Benjamin Moore Wickham Gray
GuidePaints

A Complete Guide on Benjamin Moore Wickham Gray

by Tyler Hernandez August 17, 2023
written by Tyler Hernandez

Benjamin Moore Wickham gray is undeniably a stylish choice for gray paint color, but its coolness can turn icy when exposed to North facing light. To illustrate, consider comparing Wickham gray and classic gray on a wall devoid of direct natural light.

Benjamin Moore Wickham Gray belongs to the esteemed historic color collection, which showcases a comprehensive range of 191 revered hues, making it our most sought-after palette. These refined and elegant colors from the historical collection provide a timeless aesthetic suitable for traditional and contemporary environments.

To create an open and airy ambiance throughout our house, you should have a fondness for incorporating light gray paint colors. This allows you to establish a neutral foundation and subsequently introduce vibrant elements for adding visual interest. This approach offers the advantage of easy and cost-effective customization, as you can effortlessly swap colorful pieces if you ever desire a change. However, selecting the perfect gray color is undoubtedly a challenging task.

Details and Specifications of Benjamin Moore Wickham Gray

Details and Specifications of Benjamin Moore Wickham Gray

To truly understand the worth of color, the key lies in getting into the specific details and specifications of Benjamin Moore Wickham Gray. Therefore it is essential to familiarize yourself with the fundamental theories and facts before deciding to select the paint color for your home.

Firstly, you must understand the concept of light reflection value, i.e., LRV, which serves as a measurement unit of lightness and darkness of paint color. In the case of Benjamin Moore Wickham Gray, the LRV is recorded at 68.94, which provides valuable insight into its light-reflecting properties.

Undertones of Benjamin Moore Wickham Gray

Undertones of Benjamin Moore Wickham Gray

Benjamin Moore Wickham Gray gives a captivating undertone by combining hints of both blue and green. This characteristic adds an extra layer to the paint color by setting it apart from grays that possess a singular undertone, such as blue or purple.

It is important to understand the significance of undertones when you’re going to select a paint color. By recognizing that Benjamin Moore Wickham Gray is a lighter-toned gray with a green-blue undergone, you can explore alternative options in light blue-gray shades.

Coordinating Colors with Benjamin Moore Wickham Gray

Coordinating Colors with Benjamin Moore Wickham Gray

To fully appreciate the beauty of Benjamin Moore Wickham Gray, it is crucial to find its pair with care and creativity. This involves selecting complementary color schemes that harmonize seamlessly with this soothing shade. Consider pairing Benjamin Moore Wickham Gray with crisp whites.

Dark sage green and lighter beiges serve as excellent choices to complement this paint color. To add a touch of sophistication, metallic accents like black, gold, and brass can be incorporated into the design scheme.

Moreover, the choice between a monochromatic or contrasting color palette can be made based on the interior design style and personal preference allowing for further customization and visual impact.

Test Your Color of Benjamin Moore Wickham Gray

Test Your Color of Benjamin Moore Wickham Gray

To make sure of the correct color selection, it is essential to experiment with multiple shades of your desired colors. Begin by collecting various shades of gray with blue undertones, and then consider adding it with green or even purple.

In order to determine the most suitable colors for your space, it is necessary to compare them with other colors too. This approach will help you in the easy identification of undertones and helps in determining which shade is preferable, whether lighter or darker.

Follow some instructions to test your wall colors accurately. Paint a large square of the desired color on a white poster board, leaving a white border, or opt for ordering peel-and-stick samples for your convenience. Peel-and-stick samples are generally recommended for their simplicity.

Which Color Works with Benjamin Moore Wickham Gray?

Which Color Works with Benjamin Moore Wickham Gray

Certain shades of gray do not complement different shades of white, but that is not the case with Wickham gray. This color is more versatile and harmonizes beautifully with whites and true whites. Examples of true whites are Oxford White and High Reflective White. These colors are devoid of undertones and are particularly recommended for creating a striking contrast between your trim color and wall color.

For a gentler and more subdued aesthetic, the combination of Wickham Gray with a creamy off-white like Cloud white or Dove white is highly appreciated.

Compare Benjamin Moore Wickham Gray with Other Colors

Compare Benjamin Moore Wickham Gray with Other Colors

If Wickham Gray is on your list, chances are that you are considering other gray paint colors. It is beneficial to contrast the paint color, which is under review, with other popular options within the same color family. The comparison proves to be valuable when faced with the situation of deciding between two closely related and popular shades.

1. Sea Salt, in Comparison to Wickham Gray

Sea Salt, in Comparison to Wickham Gray

Where Wickham Gray exhibits blue-green undertones, Sea-salt inclines towards a blue-green hue with a significant amount of gray mixed in. Sea salt color undeniably possesses its own distinct color identity.

The comparison between the two also emphasizes the substantial gray undertones in Wickham Gray. Thus, when discussing the green and blue undertones, a direct comparison with a true green-blue shade like sea salt reveals the neutrality of the color.

2. Gray Owl Comparison

Gray Owl Comparison

Gray owl, a highly sought-after gray paint color from Benjamin Moore, shares similarities with Wickham Gray as both of these exhibit blue and green undertones. However, when directly comparing the Gray owl to Wickham Gray, the former appears closer to a genuine shade of gray.

Despite sharing the same undertones, Wickham gray contains a more prominent presence of blue and green compared to Gray owls. It possesses a distinct and almost stormy quality while still maintaining a relatively light appearance. Interestingly, both have similar Light Reflection Values (LRV), resulting in comparable depths. Consequently, neither of the shade appears lighter or darker than the other when observed side by side.

3. Classic Gray Comparison

 Classic Gray Comparison

Benjamin Moore’s Classic Gray encompasses a significant amount of gray while occasionally leaning towards beige. This warm hue exhibits a neutral appearance but doesn’t quite achieve the effect of pure white paint color.

Compared to Wickham Gray, Classic Gray is slightly lighter and inclines more towards an off-white shade. It is an excellent choice if you desire a color that effortlessly complements various elements. It enhances its versatility as well as carries a warm undertone.

4. Horizon Shade Comparison

 Horizon Shade Comparison

Horizon is a gentle hue that inclines towards gray and is an off-white paint color from Benjamin Moore. Like Wickham Gray, Horizon also exhibits blue and green undertones. It is a lighter version of Wickham Gray. The overall similarity between the two is apparent, and also it contains slightly less blue than the latter shade. Both colors evoke a chilly, icy aesthetic, emanating a similar visual impression.

Where You Can Use Benjamin Moore Wickham Gray?

Where You Can Use Benjamin Moore Wickham Gray

No matter the space, whether it is the home office, living room, bedroom, or kitchen, this paint color is suitable for all the areas of your home. You should use this color in your home because this color exudes a sense of positivity and makes it an excellent choice for fostering a healthy mindset. When considering design style, this color complements coastal, Caribbean, and modern interior design styles exceptionally well.

1. Living Room & Dining Room

Living Room & Dining Room

This color is an ever-reliable choice that will never disappoint. If you desire a cool and lay-back ambiance in your room, you could consider this color seriously. As this color doesn’t exude a warm and cozy vibe on its own, you can introduce a warm off-white shade on the opposite wall to create a harmonious balance in the overall appearance. When it comes to a fireplace, you can opt for white bricks, which add a charming and rustic touch. As far as furniture is concerned, go for something with a natural wood base. This combination offers a timeless and elegant look and also complements the overall design scheme.

2. Bedroom

Bedroom

Consider painting all the walls in this Benjamin Moore Wickham Gray for an immersive and blissful experience. For your bedroom, you can either go for a natural theme incorporating jute and seagrass elements or choose curtains, rugs, and throw pillows of off-white colors, to maintain a cohesive look. To create a striking contrast against the main color and add visual interest to your space, you can consider including shades of gray and yellow-green.

For the exterior of your home, this color can be applied to the walls using whites, moldings, and special architectural features. If you want to add a captivating contrast, you can add blue colors to the doors and windows. Such bold choices will make them stand out and add a striking visual element to the overall exterior design.

Summing it Up

All in all, Benjamin Moore Wickham Gray color, which is discussed throughout, offers a versatile and pleasing option for various spaces in your home. With its cool and lay-back appeal, it is perfectly suitable for creating a calming atmosphere in the living room or a sea-facing bedroom.

To make the color scheme look even better, you can use materials that can add a touch of elegance and make everything more stylish. You should also consider using natural materials, which will help create the desired atmosphere and make the space feel even more inviting and cozy. Not limited to the interiors, this can also be applied to the exterior walls of your home.

This color choice offers a sense of tranquility, elegance, and versatility, making it a reliable and timeless option for transforming your living spaces into havens of style and serenity.

Frequently Asked Questions

What Are the Undertones of Wickham Gray?

Undertones of Wickham gray are predominantly blue and green. It gives a cool and serene sense of the surrounding. These undertones contribute to its distinctive appearance and create a feeling of calmness and a hint of freshness.

What Are the Best Colors for Combining with Wickham Gray?

It pairs well with a variety of colors, like creamy white, warm off-white, and shades of beige, to create a harmonious and neutral palette. Soft blue and green can also be used as a combination. The best color combination will depend on personal preference and the desired mood or style of the space.

What Is the Difference Between Wickham Gray and Stonington Gray?

Wickham Gray is a light gray with blue and green undertones that gives a cool and refreshing appearance, whereas Stonington Gray is a medium-toned gray with a hint of blue undertone and provides a more neutral and balanced look.

Are There Any Colors than White that Can Be a Good Combination with Wickham Gray?

Yes, there are colors that can go with Wickham Gray, which are not whites. Soft blues or soft greens, or even light yellow, are some of the colors that you can pair with gray tones without any hesitation. These are the colors that can give you the feeling of calmness in your space. There are various options in colors you can explore to pair with gray.

How Can I Make My Kitchen Space Look Warm with Wickham Gray?

To create a warm ambiance in your kitchen, consider you can go for warm-toned accent materials and natural wood elements, like cabinets, countertops, or flooring of colors like honey oak or walnut. You can also use warm metallic finishes like brass or copper for fixtures and hardware. Other than these options, you can opt for warm lighting, like soft pendant lights or under-cabinet lighting, to enhance the cozy atmosphere.

August 17, 2023 0 comments
0 FacebookTwitterPinterestEmail
Sherwin Williams Agreeable Gray - A Timeless Neutral
GuidePaints

A Detailed Guide on Sherwin Williams Agreeable Gray

by Marco Bianchi August 17, 2023
written by Marco Bianchi

When choosing the right color for your home, selecting the one that not only complements your style and overall decor but also stands the test of time is imperative. Neutral shades have been a fail-proof alternative when choosing the primary wall colors for your home. They serve as a blank canvas to go about with the color scheme of your space and choose the rest of the decor accordingly.

While we speak specifically of these soothing tones by Sherwin Williams, we can certainly agree with the versatility of the shade “Agreeable grey (SW7029)”. There is certainly no doubt that this timeless shade is garnering popularity in the world of interior design.

This timeless shade has garnered immense admiration from homeowners to esteemed interior designers due to its ability to blend into different spaces. Agreeable Grey will be a smart choice if you are looking for a neutral paint color.

Greige is Here!

Greige is Here!

We have seen many quick interior decor trends that may come and go over different seasons. However, the hugely sought-after grey interiors have been popular for a notable time period. We have seen many iterations of the classic grey shade, and Sherwin Williams Agreeable Grey is a classic example of the same. This shade is a reflection of beige with cool blue undertones of grey, which is why the term “greige” is more popular in this regard. The softness of beige prevents the grey from looking too cold.

Characteristics of Agreeable Gray

Sherwin Williams Agreeable grey is a warm grey color that combines cool and warm undertones beautifully. It falls in the light to medium-toned grey category, with subtle beige undertones that add warmth and depth to the color. This delicate blend creates a soft and inviting feel that is both soothing and versatile.

The neutral nature of Agreeable Grey allows it to blend seamlessly with a wide range of design elements, thereby making it an excellent choice for different spaces. It is a relatively easier color to work with and can merge effortlessly with other hues without them clashing. If you are looking for something away from the gloomy blue-toned rays, this greige shade will be the right pick. It strikes a perfect balance between minimal and classy.

Light Reflectance Value of Agreeable Gray (LRV)

LRV is the measurement of the percentage of light a color reflects. The Light Reflectance Value of Sherwin Williams Agreeable Grey is approximately 60. A higher LRV signifies the properties of color to reflect more light, thereby making the room appear brighter. In comparison, a lower LRV represents the characteristics of a color to absorb more light.

With an LRV of 60, Agreeable Grey falls in the mid-range of light reflectance, offering a balanced reflectivity level to help create a comfortable and inviting atmosphere.

Versatility and Adaptability

Agreeable grey is a popular neutral color that works well with other soothing tones and pastel hues. It is amongst the Top 50 Sherwin-Williams Bestsellers. The versatility of this mighty hue makes it compatible with different spaces. This shade has become one of the most relevant and practical choices from traditional to contemporary homes. Agreeable Grey is a perfect backdrop for your style preferences, whether you are looking for a sleek and minimalist aesthetic or a rustic and cozy vibe.

Another aspect of its versatility lies in its ability to adapt to different lighting conditions. Its appearance differs in natural lighting as well as in artificial lighting. Agreeable grey appears differently in well-lit spaces, thereby creating an open and spacious atmosphere. However, it offers a sense of warmth and comfort in spaces with limited lighting. This adaptability offers you infinite possibilities to create a space that caters to your requirements.

Compatibility with Different Decor Styles

1. Contemporary Chic

Agreeable grey blends perfectly well with various design styles like clean lines, sleek furniture, and minimalist decor. Its soft undertones offer a calming backdrop that allows other pieces of furniture and artwork to shine bright.

2. Traditional Spaces

Agreeable grey adds a touch of elegance and sophistication to traditional spaces. This neutral shade creates a timeless and refined ambiance by complementing classic furniture and architectural details. This shade goes perfectly well with Moroccan-inspired decor.

3. Coastal and Farmhouse Inspired Spaces

This calming shade works amazingly well in coastal and farmhouse-inspired spaces. It creates an inviting and soothing atmosphere by blending with natural textures, wood tones, and breezy fabrics.

4. Eclectic Home Interiors

This neutral hue offers a blank slate for those with a keen eye for detail. It provides an opportunity for vivid textures and motifs to be the highlight. It acts as a grounding element, thereby allowing other design elements to come together cohesively.

Home Styling Inspiration with Agreeable Grey

  • Agreeable Grey is your go-to option if you are looking for something essentially minimal. This soothing wall color will work perfectly for living rooms with ample natural light or abundant artificial lighting.
  • Apply a fresh Sherwin Williams Agreeable grey coat to your living room walls. Place a white sectional modular sofa, a glass coffee table with a silver-tone finish, and some metallic decor accents. To have abundant natural light, sheer white ruffled curtains will be a great pick. To have a brighter feel during the evenings, having abundant natural lighting through a Sputnik metallic chandelier and ceiling lights will work well.
  • Instill a sense of calm in your bedroom with Agreeable grey walls. Furniture in Mahogany or grey will do the talking for an elevated vibe.
  • This shade will be a great alternative for reading corners. Place a mustard yellow, an aqua blue, or a fuchsia pink wing chair and a complementing ottoman for a cozy reading space.
  • Who said only walls deserve to be painted? Your ceilings call for some attention too. Liven up your kitchen interiors as you paint your kitchen ceilings with this shade. Combine the same with white kitchen cabinets and black industrial-style lighting for a luxe effect.
  • Create a Mid-Century modern vibe by combining Agreeable Grey with traditional retro-inspired furniture. Incorporate geometric motifs through cushions, rugs, and artwork.
  • Create a coastal-inspired look by combining this neutral shade. Add a beachy vibe through seashell decor accents and aqua colors through furnishings. Use natural materials like rattan and jute to add the sandy hues.
  • Agreeable grey will blend perfectly well with an eclectic mix of quirky design elements, thereby allowing them to shine bright without a chaotic look.

Color Combinations that Work Well with Agreeable Grey

1. Crisp White

Pairing Agreeable grey with crisp white will create a fresh and clean look. It adds brightness and contrast, thereby allowing the grey to stand out for a more balanced feel.

2. Beige and Cream

Since Agreeable Grey is a blend of grey and undertones of beige, this neutral hue will merge effortlessly with soft beige and cream colors. The combination of these hues creates a warm and inviting atmosphere for a timeless look.

3. Navy Blue

The combination of navy blue with Agreeable grey will create a sophisticated and refined look. The rich navy blue adds depth, while the neutral grey offers a neutral base to anchor the space.

4. Pale Blue

If you are looking for a more serene ambiance, pairing Agreeable grey with powder blue or pale blue will make an excellent choice. The blue hue’s coolness will complement the grey’s warmth for a tranquil space.

5. Blush Pink

Consider pairing Agreeable grey with blush pink and its undertones for a feminine look. The soft pink adds a pop of color while maintaining a sophisticated look.

6. Charcoal Grey

If you are looking for a more dramatic and monochromatic look, the combination of charcoal grey with the Sherwin Williams Agreeable grey will make a captivating choice. Charcoal grey will add more depth, while Agreeable grey will strike a balance.

7. Sage Green

Agreeable grey will blend perfectly well with earthy tones like sage green. This combination will create a serene atmosphere, thereby bringing the feel of the outdoors into your space.

Comparing Sherwin Williams Agreeable Grey with Other Colors

1. Sherwin Williams Repose Grey

Sherwin Williams Repose Grey

Agreeable grey and Repose grey are often compared due to their undertones and popularity. While both are warm greys, Repose grey is slightly cooler than Agreeable grey.

2. Benjamin Moore Revere Pewter

Benjamin Moore Revere Pewter

As compared to Agreeable Grey, Revere Pewter has a slightly warmer undertone and leans more towards beige. Revere Pewter has an LRV of 55, which makes it darker than Agreeable Grey.

3. Sherwin Williams Accessible Beige

Sherwin Williams Accessible Beige

While Agreeable grey falls more into the grey category, Accessible Beige is inclined more towards beige with slight grey undertones.

Pros and Cons of Agreeable Grey

Pros

  • One of the major advantages of Agreeable Grey is its versatility to blend seamlessly with varied color schemes and decor settings. Whether you are looking for traditional, contemporary, rustic, coastal, or Bohemian home decor, this neutral color has the adaptability to work well with a magnitude of interior styles.
  • Unlike many colors that may go out of style easily, this shade has been popular for years and continues to be a go-to option for many homeowners and interior designers. It offers a classic, enduring look that stands the test of time and varying design trends.
  • Agreeable grey appears differently in different lighting conditions. It creates a brighter feel in well-lit spaces and retains its warmth in limited lighting.
  • This neutral grey hue serves as a blank canvas to let other bright colors shine while maintaining a perfect symphony when combined with lighter tones.

Cons

  • Agreeable grey is a slightly gloomy alternative for those who prefer vibrant and cheery hues. Agreeable grey is not the best choice if you are looking for a paint color that makes a statement or serves as a focal point. It is a more subdued and understated option.
  • Agreeable grey has a muted and soft appearance, which can be a drawback if you’re seeking vibrancy and high contrast. If you want to create a room with a distinct color separation, you will need to add other shades along with this neutral grey.
  • While the adaptability of Agreeable Grey to different lighting conditions is an advantage, it is equally a challenge too. It will create the desired impact in well-lit spaces. Thus, you need to consider your space’s natural lighting and might need additional artificial lighting solutions.

Conclusion

All in all, Sherwin Williams is a popular neutral color that is admired essentially for its warm undertones and adaptability to different interior designs. It has stood the test of time and has been one of the most sought-after colors by homeowners and design professionals.

It is a reliable choice for creating a warm and inviting space. Its inclination towards beige undertones makes it a captivating choice for creating a timeless look. Whether you want to paint your entire home or add a fresh coat of color to a specific space in your home, this neutral shade will make a classic choice.

However, if you are looking for a bright look, this mighty shade will easily complement other vibrant hues to strike a perfect balance between minimal and eclectic. This color provides a cohesive and harmonious look throughout your home.

Frequently Asked Questions

What is the Undertone of Agreeable Grey?

Agreeable grey has a slightly warmer feel as it is inclined towards undertones of beige. This creates a soothing and inviting ambiance, and the warmness of beige evenly balances the boldness of grey. This gives rise to the term “greige,” as it features the perfect blend of grey and beige. It strikes the right balance of warmer and cooler tones.

Does the Appearance of Agreeable Grey Change for Different Lighting Conditions?

Yes, the appearance of Agreeable grey varies as per different lighting conditions. It creates a bright and airy feel in well-lit spaces while retaining its warmth and coziness in spaces with limited lighting. In such cases, you will need to put up some additional artificial lighting.

Can I Use Agreeable Grey in Any Room of My Home?

Yes, absolutely! Agreeable grey is a fail-proof color for living rooms, bedrooms, reading corners, kitchens, and even bathrooms. Its versatility to adapt to different decor settings and color schemes makes this shade preferable.

Is Sherwin Williams Agreeable Grey a Good Quality Paint?

Yes, unquestionably! The Sherwin Williams Agreeable Grey is a premium quality paint. The company offers high-quality paint products, and this shade is no exception. It ensures smooth application, excellent coverage, and a long-lasting finish.

August 17, 2023 0 comments
0 FacebookTwitterPinterestEmail
How to Make a Barn Quilt
Guide

A Complete Guide on How to Make a Barn Quilt Patterns 

by Ingrid Svensson August 17, 2023
written by Ingrid Svensson

Don’t you think barn quilts have been famous for adding charm and color to outdoor spaces in the past few years? These painted quilt squares are mostly placed outside the barns to show off the creativity and history of many countryside areas.

In this article, we’ll discuss how to make a barn quilt step by step, from choosing a design and collecting the materials to painting the quilt squares and finally displaying them.

Making a barn quilt is an easy and fun way to showcase your talent and leave a long-lasting mark on your property, whether you’re an experienced artist or a newcomer.

So let’s start and learn how to make a quilt that will brighten your barn with vibrancy, telling a story that captivates everyone’s attention. For a better understanding, let’s first see the history of barn quilts.

What is the History Of Barn Quilts?

Before we start understanding the process of making a barn quilt, let’s first take a moment to realize what it is. A barn quilt is simply a piece of painted wood that resembles a quilt block. The barn quilt pattern is generally based on traditional designs, primarily geometric shapes, bright colors, and complicated ways. These beautiful works of art are put up on sheds, barns, or other big outdoor spaces of buildings to make a stunning display.

What is the History Of Barn Quilts

Barn quilts have a long and fascinating past as they come from the traditions of rural America. In the middle of the 2000s, Donna Sue was born and raised in Ohio and wanted to honor her mother’s love for quilting. So she decided to paint a quilt pattern on a square wood and mount it on her barn.

The idea behind this caught on quickly, and soon, there were barns, sheds, and several other buildings all over the country. In today’s world, these barn quilt patterns are a popular form of public art that turns ordinary buildings into colorful canvases that showcase the community, their imagination, and their history.

Barn quilts are beautiful not only because of how they look but also because of the stories behind them. Each barn quilt pattern has its meaning and symbols, often based on the place’s history, natural surroundings, and customs wherever it is displayed. From flower themes to geometric patterns, barn quilt patterns give you many ways to showcase your style and capture the spirit of your surroundings.

How to Select a Design While Exploring Barn Quilt Patterns?

While making a barn quilt, the first step is to choose a style and design that resonates with you. Since there are so many barn quilt patterns, you should be able to find the perfect one that fits your style preferences and captures the essence of your surroundings. So let’s take a look at some of the most exciting barn quilt patterns:

How to Select a Design While Exploring Barn Quilt Patterns

1. Star of Ohio

Star of Ohio Design is one of the world’s oldest and favorite barn quilts. This design has a giant star in the middle and is surrounded by the other eight triangles. The Ohio Star is mainly a tribute to the state of Ohio, as it was the first place where the barn quilt trend took off. Its classic symmetrical form makes it the most eye-catching part of any barn.

2. Flying Geese

The Flying Geese design is perfect for a barn quilt pattern showing movement and freedom. This pattern shows a group of geese flying together, showcasing how beautiful their wings are and how well they move together. The Flying Geese pattern gives you the outside space of the barn for a bit of movement and energy, catching the spirit of animals and nature.

3. Log Cabin

The Log Cabin design is a long-lasting and versatile choice for a barn quilt. Strips of paint or fabric are usually put together in a square pattern to create an image. This pattern also represents the safety of home and warmth, making it a popular choice for other buildings and barns that make people feel at home and welcome.

4. Carpenter’s Wheel

Carpenter’s Wheel is a perfect pattern for people who want something more exciting and complicated. This pattern comprises overlapping circles and has a complex color scheme that makes it look more intricate and fascinating. The Carpenters Wheel Design takes attention and accuracy to detail. It makes a beautiful and thoughtful barn quilt.

5. Sunflower

Another great choice is a design that looks like something from nature. The sunflower pattern shows these beautiful flowers’ bright yellow petals and brown hearts. These flowers also add a burst of happiness and color to any barn it is put on. It represents health, happiness, and the beauty of nature.

When selecting a barn quilt pattern, you should always consider the scale and size of your barn and its scenery. Larger barns can handle more complicated designs, while the smaller ones can look great with simple and basic techniques as they make strong statements. You should also consider the colors in your chosen patterns and see how they will look with stains already on your barn and surrounding area.

One of the most fun experiences of making a barn quilt is looking at different designs until you find the one that speaks for you. Think about your preference, style, the story you want to tell, and the effect you want to make. That’s because by choosing the correct pattern that speaks to you, you’ll be well on your way to making barn quilts that add charm and color and become meaningful pieces of art that represent you and your culture.

What Are the Materials Required for Creating a Barn Quilt?

Once you’ve selected an interesting pattern for your barn quilt, it’s time to get the materials you’ll need to make it come to life. To make a barn quilt that will look nice and will last long, you need to plan and choose your materials carefully. So here’s a list to help you with the things you might need.

What Are the Materials Required for Creating a Barn Quilt

1. Paint

Pick a paint color that is made to be used outside. Rubber or acrylic paints are often used for barn quilts as they have bright colors, last for a long time, and, most importantly, are easy to use. So think about choosing a range of colors that go well with your selected pattern and fit in well with the surroundings.

2. Exterior Grade Plywood

Choose an excellent exterior-grade plywood sheet to create a strong base for your barn quilt. The size of the plywood will depend on the barn quilt you’re making. So make sure the board is thick enough to stand up to the weather outside and give you a stable surface to paint on.

3. Primer

You must put on a coat of primer to ensure the paint sticks to the surface and is smooth. Choose a base that can be used outside and will work with your paint. Primer stops damage and seals the plywood from moisture, and makes your barn quilt long-lasting.

4. Rollers and Brushes

Having a variety of rollers and brushes on hand will let you make different paint effects and cover significant areas easily and quickly. Pick the right brush with plastic bristles, which can be used for latex and acrylic paints. Rollers are great for spreading a base coat evenly and quickly, covering a more extensive area of the quilt pattern.

5. Sandpaper

Before painting, you should lightly sand the plywood’s surface to prepare it perfectly. This step helps in making it a smooth, even surface for painting, which helps the paint stick to the wood better.

6. Measuring Tape and Ruler

It would help to use accurate markings and exact measurements for a visually appealing and symmetrical barn quilt. Use a measuring tape and a ruler to draw the size of your quilt square on a board, and make sure that the lines are correct and of perfect size.

7. Piece of Plastic and Drop Cloth

Put down a plastic sheet or a drop cloth to catch any paint spills and cover your work area. It will make it easy to clean up and keep paint from getting on the ground or other nearby areas.

If you properly prepare the materials, you can make your barn quilt stand up to the weather and keep its bright colors over time. Invest in good-quality materials and use tools that will help your barn quilt look better and long-lasting, making it a treasured piece of outdoor art.

Once you have everything you require, you can start making your barn quilt. With attention to detail and careful planning, you’ll be on your way to turning a simple piece of plywood into a beautiful piece of art that can add charm and character to your barn.

How to Create the Final Barn Quilt?

Now that you’ve everything you require, you can start making your final barn quilt. To create your masterpiece, you need to follow these instructions:

Final Barn Quilt

1. Plan the Design

Use a measuring tape, a ruler, and a pencil to make marks for the required size of your quilt square pattern. Cut the smaller pieces into squares based on the plan you want for your quilt. It will help you figure out how to paint each part of your image.

2. Get the Wood Ready

Firstly, clean the board to get rid of the dust particles. Start sanding it lightly to make a smooth surface for painting. Then put a layer of paint and let it dry all the way.

3. Start Painting

Start coloring your quilt squares background. Select a color that goes well with your preferred design. Apply an even coat of paint with a brush or roller, let it dry completely, and then move on to the next step.

4. Add Patterns on The Quilt

Now it’s time to make the barn quilt pattern you picked come to life. Refer to your design plan once, and then use different colors to paint the different parts of the pattern. For small details, use small tools and take your time. If you’re unsure about your ability to paint by hand, you can use stencils to create straight lines and shapes that look the same.

5. Add Some Last Touches

Once the painting is completed, step back and look at your barn quilt. Make all the last touches and changes required to ensure the end result looks clean and professional. Apply a clear coat of protection to the whole quilt to keep it safe from the weather and brighten the color.

How to Display Your Barn Quilt?

Final Barn Quilt Display

When you are finally done making a barn quilt, you need to find out the best place to show it off. Most people put it outside a barn or a shed, but you can also place it in a garage, fence, or any other prominent outdoor structure. Make sure the surface is clean and ready before using screws and nails to display your barn quilt securely.

Do not forget that barn quilts aren’t only trendy in rural areas; they also add color and personality to neighborhoods in the city. If you don’t have an excellent place to display it, you can put it on a solid wooden frame and hang it on the wall. So congratulations! You’ve done a great job making your barn quilt.

Conclusion

Making a barn quilt is a creative and fun project that lets you add a colorful touch to your barn, show off your artistic skills, and honor country traditions. From looking at barn quilt patterns to getting the materials ready to paint the quilt square, each step adds to the work of art that will look charming and beautiful in your barn.

By selecting a design that fits your style and you like, you can give your barn a unique look that makes it stand out in the scenery m. Whether you choose a traditional pattern like an Ohio star or a design inspired by nature like a sunflower, your barn quilt will be a visual treat of your creativity and a sign that values rural history.

So please take pleasure in creating your barn quilt, enjoy making your design come to life, and let your mind run wild as you create a work of art that inspires and captivates everyone who sees it.

Frequently Asked Questions

Can We Still Make a Quilt if We Don’t Have a Barn?

Absolutely Yes! You can still make a quilt even if you don’t have a barn. Barn quilts can be hung on barns, sheds, fences, or even on the wall hanging inside. You can also outside the box where you can display your barn quilt.

How Much Time Do We Need to Make a Barn Quilt?

The time it takes to make a barn quilt depends on how intricate the design is, the size, and your experience. Depending on how long it takes to prepare, paint and dry, you can have a few days to a few weeks.

How to Keep Your Barn Quilt in Good Shape?

Your barn quilt can last long if you check it every day to see the signs of damage or paint that is coming off. Touching up any spot that needs paint of the same shade. Adding a protective coat every few years can keep the colors bright and protect the quilt from the weather.

Can We Make Our Plan for Creating a Barn Quilt?

Yes! Making your design lets you show your creativity, not just these traditional patterns that have become common these days. So use your creativity, get ideas from your surroundings, or use symbols that mean something to you to make your pattern.

August 17, 2023 0 comments
0 FacebookTwitterPinterestEmail
A Complete Sofa Dimensions & Measuring Guide
Guide

A Detailed Guide on Sofa Dimensions to Choose the Right Sofa

by Freja Johansson August 9, 2023
written by Freja Johansson

Sofas are an important consideration when choosing the right furniture for your home. This is why it becomes crucial to have the right dimensions of every piece of furniture to ensure the perfect fit. Thus, before you choose to make the final purchase, be sure of the sofa dimensions to make the most of it.

Choosing the right sofa for your living space involves more than just considering its design and style. Understanding the dimensions and measurements of a sofa is key to achieving a perfect fit and creating a harmonious living environment. Measuring sofa dimensions accurately is crucial when it comes to finding the perfect fit for your living space.

Whether buying a new sofa or rearranging your existing furniture, understanding the factors influencing sofa measurements is essential.

This blog will serve as a detailed guide on how you can ensure the right sofa dimensions to make informed decisions.

Sofa Width

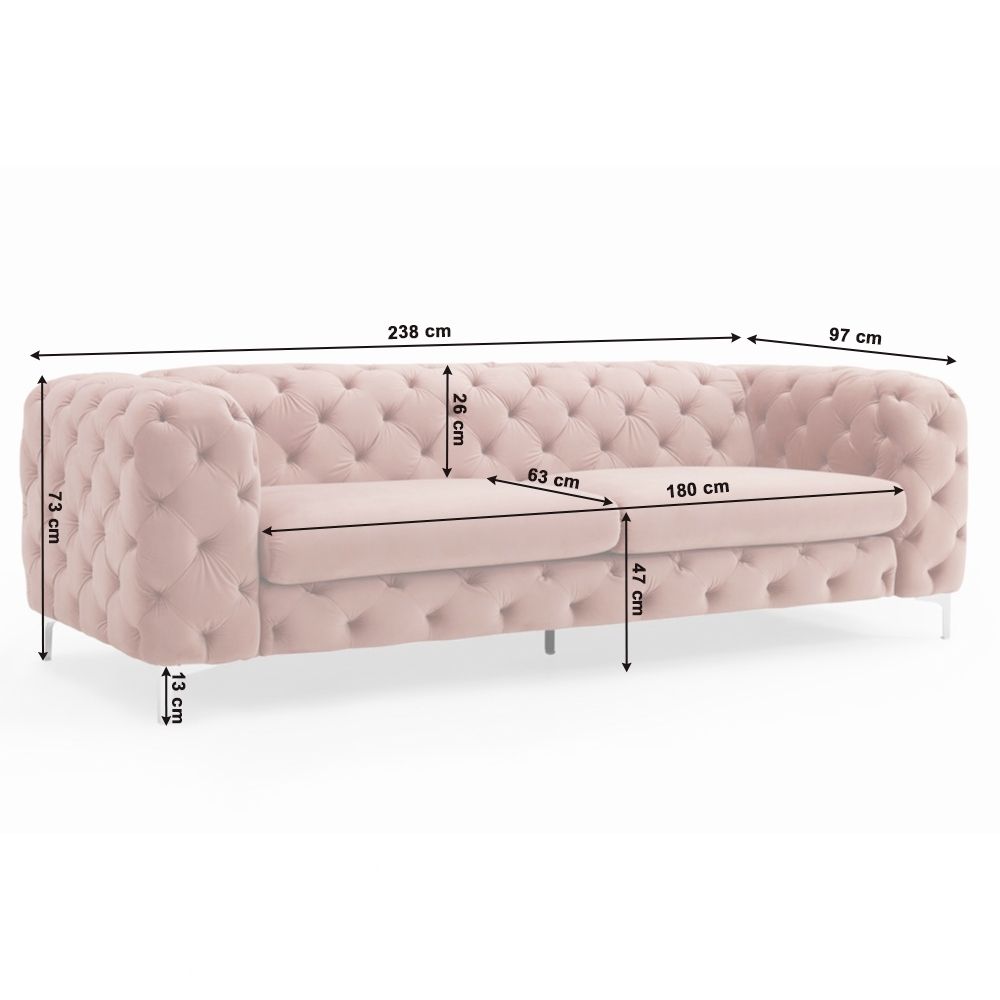
The distance from the one armrest edge of the sofa to the other is considered to be the sofa width. A standard sofa width is around 90 inches, while anything lesser than that is considered to be a Loveseat sofa. It is essential to measure the width accurately to ensure the sofa fits within your room without overpowering or obstructing other furniture or walkways.

When measuring the sofa width, consider the size of your room and the overall layout. If you have a spacious living area, you may opt for a wider sofa to accommodate more people comfortably. However, in smaller rooms or apartments, a narrower width might be more suitable to maintain a sense of openness and prevent the space from feeling cramped.

Sofa Depth

Sofa depth is another crucial dimension to consider when measuring and selecting a sofa. The depth of a sofa refers to the front-to-back measurement, from the edge of the seat cushion to the backrest. It plays a significant role in determining the comfort and functionality of the seating area.

When measuring the sofa depth, it’s important to consider how you plan to use the sofa. A deeper depth allows for more lounging and relaxation, providing ample space to sink in and stretch out. It can be ideal for individuals who enjoy cozying up with a book or watching movies for extended periods. However, keep in mind that a deeper sofa might require more floor space and can dominate a smaller room.

Sofa Height

Sofa height is an important dimension to consider when measuring and selecting a sofa. The height of a sofa refers to the distance from the floor to the highest point of the sofa, typically the top of the backrest or cushions. It plays a significant role in determining the overall look, comfort, and functionality of the sofa.

When measuring sofa height, it’s crucial to consider both practical and aesthetic factors. From a practical standpoint, the height of the sofa should be suitable for the individuals who will be using it. Consider the height of the people in your household and their comfort preferences. A sofa that is too low may make it challenging for taller individuals to sit and stand up comfortably, while a sofa that is too high might make shorter individuals feel their feet dangling.

Seat Back Depth and Height

By carefully measuring and considering the seat back depth and height, you can select a sofa that offers optimal comfort and support. The seat back depth is the distance from the front edge of the seat cushion to the backrest. It influences the amount of back support and seating space available. A deeper seat back allows for a more relaxed and comfortable seating experience, providing ample support for the entire back. It is ideal for individuals who prefer a laid-back lounging position.

The seat back height refers to the vertical measurement from the top of the seat cushion to the highest point of the backrest. This dimension determines the level of support provided to the upper body and can significantly impact overall comfort. A higher seat back offers better support for the shoulders and upper back, promoting good posture and comfort during extended periods of sitting.

Importance of Having the Right Sofa and Space Dimensions

1. Optimum Utilization Of Space

Measuring sofa dimensions allows you to determine the appropriate size and placement of the sofa within your room. It ensures that the sofa fits harmoniously with the overall layout and doesn’t overcrowd or dominate the space. By measuring accurately, you can maximize the available space and create a balanced and visually appealing environment.

2. Comfort and Functionality

Sofa dimensions directly impact the comfort and functionality of the seating area. Measuring the seat width, depth, and height helps you choose a sofa that provides sufficient seating space and legroom for everyone. It ensures that people can sit comfortably without feeling cramped or restricted. Accurate measurements also help determine the appropriate height and angle of the backrest, ensuring optimal support for relaxation and good posture.

3. Easy to Move

Measuring sofa dimensions is essential for assessing the ease of moving the sofa into your desired location. By measuring doorways, hallways, and staircases, you can ensure that the sofa can be transported without any difficulties or potential damage. It prevents the frustration of purchasing a sofa only to find out that it cannot fit through the necessary pathways.

4. Aesthetic Appeal

The dimensions of a sofa greatly influence the overall visual harmony and aesthetics of your living space. By measuring accurately, you can choose a sofa that complements the size and scale of the room and other furniture pieces. A well-fitted sofa enhances the overall ambiance and style, creating a cohesive and inviting atmosphere.

5. Monetary Regrets

Measuring sofa dimensions helps you avoid costly mistakes and returns. By accurately assessing the available space and considering clearances, you can select a sofa that fits perfectly without requiring unnecessary adjustments or compromises. This prevents the hassle and additional expenses associated with returning or exchanging an ill-fitting sofa.

6. Personalization and Customization

Measuring sofa dimensions allows for customization and personalization. If you have specific requirements or preferences, such as a certain seat depth or armrest height, accurate measurements enable you to find a sofa that meets your individual needs. This level of customization ensures that the sofa aligns with your comfort preferences and enhances your overall living experience.

How to Ensure the Right Sofa Dimensions for Your Space?

How to Ensure the Right Sofa Dimensions for Your Space

Measuring sofa dimensions is of utmost importance when it comes to selecting the right sofa for your living space. You can do so by following these simple yet impactful steps:

1. Measure the Space Where the Sofa is to Be Kept

Remove any existing furniture, rugs, or accessories from the space where the sofa will be placed. Clearing the area provides a clean and unobstructed surface for accurate measurements. Use a measuring tape to measure the length, width, and depth of the space where the sofa will be positioned. Take into account any clearances required around the sofa. Measure the distance from the walls or other furniture pieces to ensure sufficient space for movement and visual balance. Consider pathways, doorways, and other furniture placement, allowing for easy access and a comfortable flow in the room.

2. Front Door Measurements

If you choose to go for a fully assembled sofa, it is imperative for you to have accurate front door dimensions. You wouldn’t want to experience the disappointment of having scratches and dents on your brand-new sofa (and front door too)! Thus, to avoid such hassles, it is always a smart idea to be clear on the front door measurements to ensure a smooth entry to the sofa. You could consider measuring the height and the width of your front door to carry it upright or horizontally.

3. Hallways and Other Obstructions

If your living room isn’t the first place where you’ll be directed, you might have to pass through corridors. Thus, you need to be clear on the dimensions for these hallways, along with being mindful of barriers like any internal doors on your apartment floor.

4. Measuring the Lift Dimensions

Before measuring, confirm the weight capacity of the lift to ensure it can safely accommodate the weight of the sofa. Measure the width and height of the lift door. This will help determine if the sofa can fit through the door without any issues. Take accurate measurements at multiple points to account for any irregularities in the lift door. Once inside the lift, measure the interior width and height. This will determine if the sofa can fit comfortably without getting stuck or causing damage.

A Perfect Choice of Sofa for Comfort Preferences

There is a magnitude of options when it comes to choosing the right kind of sofa for your living space. Whether you are looking for a traditional style sofa or something that is essentially contemporary or eclectic, the possibilities are endless. We have compiled some popular sofa styles that you could consider to maximize comfort along with ensuring an aesthetic appeal. You can choose the right one for your space after being clear on the available floor area and other crucial dimensions, as mentioned above.

1. Loveseat Sofas

A loveseat sofa is a versatile and compact seating option that is loved for its cozy and intimate feel. It is designed to accommodate two people comfortably, making it ideal for small living spaces or as an addition to larger seating arrangements. Loveseats typically have a length ranging from 50 to 70 inches (127 to 178 cm), allowing them to fit snugly in tight corners or alongside other furniture pieces. With its smaller dimensions, it can fit snugly into various spaces while providing a cozy seating area for two.

2. Modular Sectional Sofas

The dimensions of modular sectional sofas can vary significantly depending on the specific design, manufacturer, and configuration you choose. However, modular sectionals are typically available in a range of sizes to accommodate different room sizes and seating needs. The length of a modular sectional can vary greatly, extending to over 120 inches (305 cm) or more for larger U-shaped or L-shaped setups. This allows you to find a sectional that fits your available space while providing ample seating for you and your guests.

3. Settees

The length of a settee typically ranges from 48 to 72 inches (122 to 183 cm). This allows it to accommodate two people while fitting well in smaller spaces comfortably. Settees are often used as accent pieces or supplementary seating in living rooms, bedrooms, entryways, or cozy corners. Due to their compact size, settees are versatile and can be placed in various settings. They are suitable for apartments, small living rooms, or any space that requires seating without overwhelming the area. Settees can also be used in larger rooms as accent pieces, providing a cozy and intimate seating option.

Final Thoughts

All in all, accurately measuring sofa dimensions is crucial for finding the perfect fit and creating a functional and visually appealing living space. It prevents the hassle and disappointment of purchasing a sofa that is either too large, leaving limited room for movement, or too small, making the space feel empty and unbalanced. Properly measuring sofa dimensions also contributes to the comfort and functionality of the seating area.

Considering seat width, depth, and height will ensure that the sofa provides adequate space for individuals to sit comfortably and relax. By taking accurate measurements, you can avoid the frustration and inconvenience of having a sofa that cannot pass through the necessary pathways.

Thus, you can make informed decisions and select a sofa that perfectly suits your space and style preferences.

August 9, 2023 0 comments
0 FacebookTwitterPinterestEmail
The Ultimate Guide to Buying and Styling a Kitchen Sofa
Guide

The Ultimate Guide to Buying and Styling a Kitchen Sofa

by Freja Johansson August 9, 2023
written by Freja Johansson

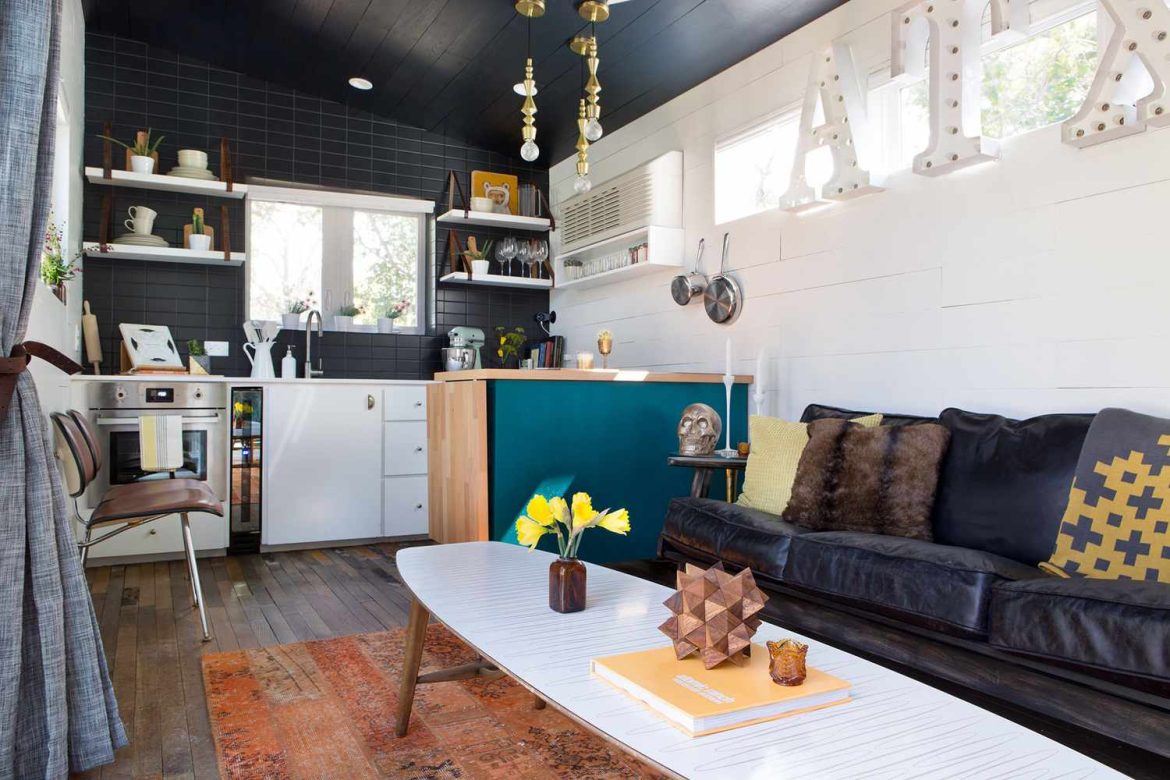
The Kitchen is no longer just a space for preparing food and cooking! Due to our more relaxed lifestyles, open-plan living has seen a noticeable increase in speech in recent years. The kitchen is not so much isolated from the living sections of the house thanks to the trend towards open, multi-purpose spaces; rather, it has evolved into the center of the home where everyone congregates.

The addition of a sofa is probably not the first thing that strikes to mind while renovating your kitchen. But you can make your area a comfortable, multi-purpose environment by adding a kitchen couch.

While adding a sofa is a good idea in the kitchen but having some ideas before buying will make you happy and comfortable.

Why Should You Add a Sofa to Your Kitchen?

A personal decision that relies on your lifestyle, interests, and available space is whether or not to add a sofa to your kitchen. It may make your kitchen more welcoming and functional, encouraging comfort, leisure, and social interaction.

1. Comfort and Relaxation

Comfort and Relaxation

Family members and visitors frequently congregate in the kitchen, which serves as the hub of the house. The addition of a cozy and inviting lounging space. While meals are being made or consumed, it gives individuals a space to unwind, rest, and socialize.

2. Additional Seating

Additional Seating

Kitchens are now multi-purpose rooms with sections for dining, entertaining, and socializing in addition to being places for cooking. In addition to typical dining chairs and stools, a couch provides additional seating alternatives, comfortably sitting more people during meals or social events.

3. Versatility

Versatility

A kitchen couch may be used in a variety of ways. It may be used for eating informally, drinking coffee, reading a book, or even using a laptop to work. The kitchen becomes more useful and adaptable to varied activities as a result of the added adaptability.

4. Space Optimization

Space Optimization

A sofa in the kitchen may be a clever solution to make the most of the space in tiny houses or apartments with limited room. It combines many functions into one area, doing away with functions into one area, doing away with the necessity for a separate living or dining room.

5. Family Time

Family Time

The kitchen frequently serves as the focal point of family activities. You may create a cozy gathering area where family members can spend valuable time together by adding a sofa. As individuals may interact and engage in different activities while yet being close to one another, it encourages dialogue, connection, and a sense of community.

6. Aesthetics

 Aesthetics

The right sofa can improve your kitchen’s overall design and attractiveness. It may act as the room’s center point while also bringing flair, color, and texture. You may create a unified and aesthetically attractive setting by choosing a sofa that goes with the concept or design of the kitchen.

7. Practicality

Practicality

For several reasons, having a sofa in the kitchen might be useful. Preparing or waiting for meals can offer a cozy place for older family members or people with mobility challenges to rest. Additionally, a couch with built-in storage can provide practical room for keeping extra cushions or kitchen necessities.

Things to Keep in Mind Before Buying a Kitchen Sofa

1. Durability

Durability

For kitchen appliances, durability is crucial, even if it’s vital for living room sofas! A couch in the kitchen will be more likely to experience spills, stains, and ordinary wear and tear. A leather sofa is usually a wonderful choice because it is quick and simple to clean. However, you are constrained by color and texture, and blemishes and scratches stand out considerably more. The model 01 couch comes with detachable and washable covers, making it much easier to keep your sofa looking new and fresh. Choosing a fabric sofa allows you infinite options. As velvet has no loose threads, it is less prone to scratch, mark, or snag, making it a highly durable couch fabric.

2. Functionality

 Functionality

Choose a sofa that is extremely utilitarian if you have a tiny kitchen and are concerned about space, yet it appeals to you. A couch bed, for instance, would provide more space for a visitor to spend the night. Or you might use an ottoman, which offers both storage and sitting. A different choice would be to purchase one or two armchairs to add some style and furnish a comfortable seating space.

3. Colors

Colors

There are a few hues that would be advisable to avoid for the kitchen, while this is undoubtedly a crucial consideration when purchasing any sofa. Even if your kitchen is all white, we don’t recommend getting a white or even cream sofa since you will see more scuffs, stains, and scratches on it. Instead, opt for a fashionable sofa that contrasts the color scheme of your kitchen by picking a darker shade that will make it simpler to conceal the inevitable mess.

Ideas to Style Your Sofa Kitchen

It’s excellent that you have made the decision to get a couch for the kitchen. It’s time to decide which style works best for you and the space.

Here are a few of our favorite kitchen couch decorating suggestions:

1. The Couch in An Open Kitchen

The Couch in An Open Kitchen

Selecting a couch with high legs, like in the above sofa model, not only helps the room seem more contemporary, but it also makes it much simpler to clean the kitchen floor when it becomes dirty since you can sweep or mop beneath the sofa without having to move it. Additionally, if you are dealing with a tiny area, it’s perfect for adding some extra storage space.

2. Corner Sofas for Both Large and Small Places

Corner Sofas for Both Large and Small Places

Corner couches are not only cozy and ideal for relaxing while cooking or drinking wine in the evening, but they also work well as a space divider to split the kitchen into several areas. Although they are more frequently employed in larger, open-plan areas, they may also be used in smaller rooms. With these couches, you may select the ideal number of modules to build a sofa that will precisely fit in any size room.

3. Sofa Replacing Dining Chairs

Sofa Replacing Dining Chairs

You may easily swap out the dining chairs for a couch if you have a short area and are determined to have a sofa in the kitchen. Your meals will be served in a special and intimate environment as a result. Place the table in front of the couch along a wall. You will discover that this arrangement can help your room seem and feel wider because the sofa will be tucked away, and no dining room chairs will be taking up floor space.

Conclusion

Last but not least, careful consideration of color, design, and positioning may assist in achieving the objective of creating a unified and balanced appearance between the sofa and the kitchen. However, adding a couch to your kitchen is a purely individualized decision that may enhance both its practicality and visual appeal. There are not any hard and fast restrictions prohibiting it, even if it might not be a common practice.

Moreover, it’s important to take into account a number of things before selecting a choice. Check the available space in your kitchen to make sure that adding a sofa impedes or restricts mobility.

In the end, adding a couch to your kitchen may increase the sitting capacity, provide a comfortable area for lounging or dining, and improve the aesthetics.

Frequently Asked Questions

Why Would a Person Want a Couch in Their Kitchen?

There may be a number of justifications for including a sofa in a kitchen. Creating a welcoming seating area for conversation or relaxation, making use of underused space, including a cozy reading or dining corner, or improving the kitchen’s general appearance are a few typical reasons.

What are the Advantages of Adding a Sofa in The Kitchen?

For socializing or informal dining in the kitchen, a couch offers additional seating for family members or visitors. Additionally, having a sofa in the kitchen provides a comfortable place to unwind, read a book, or enjoy a meal or a cup of coffee. Additionally, if your kitchen is spacious, adding a sofa may help you make the most of the space and turn it into a useful and welcoming room.

What Type of Sofa Is Best?

The greatest kind of couch for a kitchen will rely on personal taste. The amount of space available and the kitchen’s overall design. Choose a sofa that will fit comfortably in your kitchen area while not impending mobility or usefulness. Do pick a couch material that is robust, hygienic, and stain-resistant. For the kitchen, leather or materials that resist stains are frequently smart choices.

How Can I Make a Sofa in The Kitchen Blend with The Rest of The Space?

Select a couch color that goes well with or enhances the kitchen’s current color scheme. This might contribute to a unified appearance. To incorporate the couch into the entire design plan, add colorful pillows, throws, or cushions that include hues or patterns from the kitchen. Place the sofa so that it blends in with the design of the kitchen. Make sure the sofa’s design complements the kitchen’s overall design.

August 9, 2023 0 comments
0 FacebookTwitterPinterestEmail
How to remodel stairs from carpet to wood
Guide

Ultimate Guide for Remodeling Your Stairs from Carpet to Wood

by Erik Johansson August 9, 2023
written by Erik Johansson

How about a transformational project that may improve the overall aesthetic and value of your house is remodeling stairs to wood? Well, you may create a stunning focal point that enhances the personality and style of your living area by swapping out the carpeted steps for ones made of the warmth and beauty of wood.

To guarantee a smooth and safe transition, it is crucial to consider several elements before starting any remodeling project. Carpeted stairs can seem dated and begin to lose fluffiness from constant usage while accumulating dirt, dust, and grime. Those of us who have carpeted stairs are all too aware of the persistent stains and dents on several steps that, over time, may become harder or impossible to clean.

Let’s get started and learn how to create stunning and useful wood stairs that will significantly improve the inside of your house.

Considerations Before Remodeling Stairs from Carpet to Wood

There are some crucial considerations to bear in mind while considering replacing carpeted stairs with wood ones.

Here are some key things to remember:

1. Budget

Budget

Establish your spending limit for the stair remodeling job. Depending on the type of wood and the complexity of the design, the price of wood stairs might differ greatly.

2. Safety

Safety

Verify that the steps adhere to construction regulations and safety requirements. To avoid accidents, wood staircases should have a good grip and non-slip surfaces. To increase safety, think about adding railings or replacing the ones you already have.

3. Structure and Condition

Structure and Condition

Examine the underlying construction of the stairs as well as their current state. Before installing wood, look for any indications of damage or weakness that may need to be repaired. Make sure the steps are strong and able to bear the additional weight of the wood.

4. Design and Style

Design and Style

Choose the wood stairs’ preferred style and design. Think about your home’s aesthetics and select a good species, finish, and style that goes well with it. Consider the flooring that is already there and make sure the design flows.

5. Measurement and Sizing

Measurement and Sizing

Take precise measurements of each stair’s dimensions to guarantee a good fit. Think about how the stair height will be impacted by the thickness of the wood treads. Measure the breadth of the steps as well to see if any modifications are required to make room for the new treads.

6. Installing Wood Stairs

Installing Wood Stairs

Learn about several ways to install wood stairs, such as utilizing a tread overlay system or completely rebuilding the stair structure. Choose the approach that best matches your goals and degree of expertise because each approach has advantages and things to keep in mind.

7. Maintenance

Maintenance

Take into account how often wood stairs need to be maintained. For continued longevity and aesthetic appeal, wood requires periodic maintenance, such as refinishing or resealing. Be ready for routine maintenance activities and take them into consideration while making your choice.

8. Professional Assistance

 Professional Assistance

If you don’t have any expertise in remodeling stairs or doing carpentry, you might want to hire a professional contractor or carpenter. They can make sure that the installation is done correctly and deal with any problems that may come up during remodeling.

9. Duration

Duration

Estimate how long the project will take to complete. Remodeling stairs may take a lot of time, especially if you do it alone. Plan appropriately and allow adequate time to do the assignment patiently.

10. Building permissions

Building permissions

To out whether any permissions are necessary for the stair remodeling job, contact your local building authority. Permits may be needed in several jurisdictions for structural renovations or changes.

How to Remodel Your Carpeted Stairs Into Wooden

1. Place Your Treads and Riser

The stair’s tread is the area you step on, and the riser is the component to which it is joined. Order retrofit treads, please. They are specially made to be installed quickly over carpet treads. Your treads should be made of high-quality hardwood. But they don’t have to be made of the same wood unless your risers must match them. Pre-stained treads will save you time and labor, but the convenience comes at a cost. Starting at $71 for an unfinished tread from Hardwood Lumber Company and $119 for a stained one. Give yourself additional time for delivery if you place an order with them. You can also pay a little bit extra. You will probably be able to drive away with your stair parts.

2. Collect Your Tools

Gather the extra tools, supplies, and safety equipment required to complete your stair makeover once you’ve purchased treads and risers.

  • Foam Brush
  • Circular Saw
  • Nail Gun
  • Pliers
  • Pry Bar
  • Orbital Slander
  • Table Saw
  • Tape Measure
  • Utility Knife
  • Sturdy Work Gloves
  • Plastic Gloves
  • Safety Goggles

3. Remove Carpet and Padding

Get out your pry bar, work gloves, pliers, and utility knife. Make careful to wear a mask because this is a dusty job. Then take the top stair, put your gloves on, and start tearing. Slash into the carpet, beginning at the back corner of the tread and cutting across it. To remove the carpet, reach under a corner and drag it across the tread. As you descend the steps, carry out the procedure once more.
In the same way, take off the cushioning. Usually, there are several staples used to secure it. Utilizing your pliers, remove them. The tack strips holding the carpet to the subfloor may then be removed using pliers and a pry bar.

4. Chopped and Ready

Remove the noses from your current treads before installing your retrofit treads. The nose, often referred to as bullnose, projects outward from a tread’s edge by approximately an inch. For the retro treads to fit, all noses must be sawn off. Draw a line to indicate the areas you will cut with your circular saw after measuring the width of the overhang on each tread.
Please measure your current treads. Nest, using a saw, measure and cut your new treads to size. Keep note of which tread goes with which step because each stair may vary somewhat.

5. Attach Your Risers and Treads

Use construction glue to affix the first rise to the subfloor beginning at the foot of your steps. Next, set down your first tread. Alternate between the risers and treads as you climb the stairs. Each tread will rest flush against the riser thanks to this approach.

6. Staining the New Stairs

Follow these steps to do the staining of the stairs:

Prepare the Stair Parts

The producer sands the unfurnished treads. To achieve a flawless finish, you should polish them one more before staining. Before staining, remove any sawdust using a sweeper or vacuum.

Put Preconditioner, Stain, and Sealant On

To prevent ugly blotches, it is suggested to use a pre-stain conditioner. Dust particles can easily settle into moist stains and ruin your hard work, so be careful to remove them as you go. Apply 2 coats of polyurethane to preserve the stain after it has dried.

Block the Stairs

Normally, you should give your gorgeous new steps at least 24 hours before using them. Use a pet or child gate to bar the way. Consider enclosing the space with a plastic barrier, such as one of the choices offered, for further protection from dust and grime.

Conclusion

All in all, changing your home’s staircase from carpet to wood will give it fresh vitality and make a striking visual effect. You may effectively start this revolutionary project by taking into account the budget, safety, structural condition, design, measurements, installation technique, and maintenance and requesting expert aid if necessary. Wood stairs may improve the visual appeal of your living area by adding timeless beauty and durability.

The warmth and natural beauty will increase the value and appeal of your house, whether you go for a conventional or modern design. To guarantee a smooth transfer, keep in mind to prepare ahead, take precise measurements, and verify compliance with construction requirements.

Prepare to enjoy the satisfaction of a job well done that improves the look and performance of your stairway.

Frequently asked questions

How Much Does It Cost to Convert Carpeted Stairs to Wood?

Depending on the type of wood used, the intricacy of the design, the number of steps, and whether you hire contractors or do it yourself, the cost of changing carpeted stairs to wooden ones might vary. A few hundred dollars may often be expected to pay for the service.

Can I Put Wood Over Carpeted Steps that Already Exist?

Direct wood installation over currently carpeted stairs is not advised. To make sure that the wood treads are installed correctly and securely, the carpet and padding should be taken out. Before adding wood, the underlying structure should be checked for any damage or weaknesses that need to be fixed.

What Kind of Wood is Ideal for Remodeling Stairs?

The kind of wood you use to refurbish your stairs will rely on your preferences, your budget, and its longevity. Due to their durability and strength, hardwoods like oak, maple, and walnut are frequently used in construction. When choosing a wood type, gain pattern and general durability. Each type of wood has distinct aesthetic features and pricing ranges.

After Remodeling, How Do I Maintain Wood Stairs?

Regular upkeep is necessary to keep wood staircases looking beautiful and durable. This includes routine cleaning, refinishing, or resealing the wood as necessary and taking care of any dings or other damage that could develop over time. Keep your wood steps looking their best according to the manufacturer’s cleaning and maintenance instructions.

How Long Does It Take to Convert Carpeted Stairs to Wood?

The length of time needed to convert carpeted stairs to wood depends on the project’s difficulty and the size of the staircase. When you consider removing the carpet, preparing the stairs, installing the wood treads, and any necessary finishing or refinishing procedures, it can take a few days to a couple of weeks to accomplish.

August 9, 2023 0 comments
0 FacebookTwitterPinterestEmail
How to Bury a Gutter Downspout
Guide

Easy Steps to Bury a Gutter Downspout 

by David Parker August 9, 2023
written by David Parker

Want to hide your gutter downspout but don’t know how? How about adequately installing your gutter downspout so that it can be appropriately buried? Well, if that is so, then this blog may help you a lot.

Some tasks are easy to do but seem very hectic. This task is one of those tasks that is easy to do when done properly but becomes very hectic after every mistake.

If you want to improve your home’s drainage system while maintaining your lawn’s appearance, burying your gutter downspout is the way to go. By installing it underground, you can effectively guide rainwater away from your home and towards the areas of your lawn that need it most. Not only will this protect your home from drainage issues, but it can also save you money by turning the project into a DIY.

Don’t let expenses hold you back from improving your home’s functionality and aesthetics.

How Burying a Gutter Downspout Can be a Good Idea?

A significant advantage of burying a gutter downspout is that it evenly distributes water to the dry parts of your lawn, especially if your lawn has uneven water retention. This makes it an excellent solution for areas that frequently experience rainfall. Proper drainage of water away from your home is crucial as it can cause damage to the structural integrity of your house. Additionally, it can create puddles in your yard, ruining your footwear and causing your pets to leave footprints.

There are the following factors that can help your decision of either burying your gutter downspout or finding a different solution:

  1. The layout of your yard.
  2. The climate of the place where you live in.
  3. The amount of rain you get each year.

Tools Required for Burying Gutter Downspout

  1. Shovel
  2. Level
  3. 2×4
  4. Rubber mallet
  5. Chisel
  6. Utility Knife

Supplies Needed for Burying Gutter Downspout

  1. PVC Pipe
  2. Various PVC fittings
  3. Purple PVC primer and glue
  4. Black corrugated tiles and fittings
  5. Three downspout adapters
  6. One animal guard
  7. One sack of quick-rete

Steps to Bury a Gutter Downspout

Easy Steps to Bury a Gutter Downspout 

1. Identifying the Problem

Firstly, to start solving your lawn issues, it is important to pinpoint the problem accurately. Are you concerned about the appearance of your lawn, the drainage system, or the uneven distribution of water? Maybe it is all of these issues combined. Once you have identified the problem, you can start finding the best solution. Now that you know what is causing the problem, it is time to get to work.

2. Routing the Downspout

When it comes to managing rainwater in your yard, it is important to remember that each yard is unique. To start, decide where you want the water to go and create a diagram to map out the route for your gutter downspout. To prevent puddles and protect your foundation, it is recommended to drain the downspout on a hill several feet away from your home or into the sidewalk or street. Aluminum downspouts or PVC pipes above ground can work well in yards with rocky soil or lots of shrubs and bushes to hide the extension. The length of your buried downspouts will depend on the size and layout of your yard. Aim for a length of eight to ten feet to ensure that water stays away from your foundation.

3. Digging

Before embarking on your digging project, it is important to take precautions to avoid hitting any gas or utility lines. You can easily do this by contacting your state’s 811 or visiting their website.

Once you have taken care of this, it is time to get started on the fun part! Gather your tools and begin digging along the route you have mapped out for your gutter downspout. While your neighbors may be curious about your project, don’t let their questions distract you. It is important to bury your downspout at least one foot deeper than the ground level.

For those living in colder climates, keep in mind that the frost line typically falls between 36 and 48 inches below the ground. If this applies to you, dig even deeper to ensure proper installation.

Make sure the trench is wide enough to leave four inches of space on both sides of the pipe. Happy digging!

4. Demount the Old Gutter Downspout Extension

To install the plastic extension that will be buried, it is important first to remove any old aluminum extension using a screwdriver. Carefully unscrew the old extension and slide the plastic one into place. When laying down the pipe, ensure the other end is at least 8-10 feet from your home. It is crucial to maintain alignment during the process and handle the equipment with care to avoid injury.

5. New Extension Connection

A perfect plastic downspout extension should be flexible and durable. Using several solid layers of water tape and screws, connect the base of the gutter downspout carefully.

To ensure a reliable downspout extension, choose one that is both flexible and durable. Connect the base of the gutter downspout carefully using multiple layers of water tape and screws. It is important to select an extension that properly fits your gutter downspouts, which are typically either 2 by 3 or 3 by 4 inches.

When it comes to color options, black, white, and brown are the most common options. While color may not be a top priority since the extension will likely be buried underground, it is still important to ensure that it coordinates well with your home’s aesthetic.

Additionally, consider purchasing a vent for easy and affordable gutter maintenance.

6. Setting Your Downspout

Now that you have completed digging your trench, it is time to install the downspout. Make sure to position the downspout extension at a gradual angle to avoid water backup. Before burying the downspout, conduct a final inspection to identify any potential issues, such as high spots, that may hinder water flow. If everything looks good, you can proceed to bury the downspout.

7. Fill the Trench

It is time for the shovel show again! By using your shovel. Cover the downspout extension and fill it with soil. Once it is covered, settle it down carefully and softly.

You are all caught up! Now the job is done, and all you have to do is wait for the coming rainy season to see if you have done a good job or not.

Advantages of Pop-Up Emitter

  • The flow of water gets maintained in the flat yards.
  • Doesn’t let scattered pieces of waste get into your drain pipe.
  • Disguising the end of your downspout extension

Bravo! It’s done. Now you got your gutter downspout fixed perfectly enough to do wonders in the next rainy season.

Benefits of Burying a Gutter Downspout

  1. Boosts the aesthetics
  2. Prevents icy spots during winters
  3. Enhances yard drainage system
  4. It paves the way for rainwater to move away from your foundation
  5. Minimalizes the risk of pooling in your yard
  6. Prevents water damage or leaks in your home

Now let’s begin the steps of burying your gutter downspout. But before we move into the steps, let’s have a quick look at the pieces of equipment you will need to carry out this DIY project efficiently.

Summing It Up

Now that you have come to the end of this blog, we hope that you have a solution to your foundation’s drainage problem. Burying a Gutter Downspout is not as easy a task as it seems. It takes hours of hard work and labor to get this task done.

However, getting this task done by yourself as a DIY is a better option in every way. You get to know more about the problems of your foundation deeply while doing this task. Since it is a task of your home, you will get it done more efficiently and with full dedication. You can even take help from your homies to make this task even more interesting and joyful for all of you. It can even turn into a fun-learning session for your kids and new thing that they will learn about their house maintenance.

All the best for your turn, and try this task!

Frequently Asked Questions

Is There Any Chance of Freezing in Buried Downspouts?

In cold weather, there is a possibility that buried downspouts may freeze if cold water flows through them. If you suspect that your buried downspout is frozen, you can carefully pour hot water down the top of the downspout to melt it. However, if this method fails, you may need to dig up the downspout. It is important not to use a hammer to break the ice as it can cause damage to your gutter downspout.

Should I Bury My Gutter Downspout?

It depends on your specific situation. If your downspout is currently dumping water too close to your house and causing damage to your foundation or basement, then burying it may be a good solution. However, if the downspout is already directing water away from your home and causing no issues, there may be no need to bury it.

How Much Does It Cost to Bury a Downspout?

Although it depends on the place and the motive because I believe the cost of burying a downspout can vary depending on a few factors, such as the length of the downspout and the depth at which it needs to be buried. It’s probably best to contact a local contractor or landscaper to get a more accurate estimate.

August 9, 2023 0 comments
0 FacebookTwitterPinterestEmail
DIY to Build Shed Shelves
DIYGuide

An Ultimate Guide on DIY Shed Shelves Solutions

by Tyler Hernandez August 9, 2023
written by Tyler Hernandez

While you plan to build your house, you cannot afford to invest money on every little thing of detailing that requires to be done. And you must focus your efforts on saving your wallet in every possible way. Therefore, you get simple DIY projects installed to get your home decoration done. On that note, the simplest of all is getting your shed shelves done.

As a beginner, every one of you gets your shelves built in a customizable manner. This is because you have clipboards and other ready-to-use accessories that allow you to build make-shift shelves in a hassle-free manner. Suitable shed shelves must be installed near the yard areas to re-organize your supplies in an efficient manner. At the same time, you do not want boring shelves.

Let us unveil 12 mind-boggling shed shelves that can be re-created using Do-it-Yourself ways.

1. Recreate a Shelf with the Available Spaces

Recreate a Shelf with the Available Spaces

The shed already has slabs across the ceiling wall. Therefore, all you have to do is just utilize the available area to recreate your storage spaces. In an open-style manner, the spaces are already available for you to place your supplies in. And these are garage-related utilities, vacuum cleaners, and miscellaneous products that are arranged here. To add a DIY touch, you can paint these shelves using a myriad range of colors so that you bring a colorful touch to the shed shelf you plan to recreate. Similarly, wallpaper stickers can also be used to give the dimension an all-new touch.

2. Creating a Usable Workspace Within Your Shed

Creating a Usable Workspace Within Your Shed

In this DIY style, the designer has once again created a shed shelf in an open-style manner. As you can store or place your articles and utilize the spaces as an added storage area. This way, the shelves prove to be a utility cum storage area. Similarly, using tools and techniques, horizontal and vertical blocks are provided so that the durable area allows you to utilize the space in an efficient and effective manner. And, if you look at it, shed areas do not have ample storage spaces. Hence, this kind of arrangement helps you create one within the space, and the design is done in such a way that you do not break into your wallet.

3. Versatile Space for Storing Everyday Utilities

 Versatile Space for Storing Everyday Utilities

If you want to store your daily-use products in an organized manner, then this is the DIY style you can go for. And this is a storage shelf that can be budget-friendly too. This is because you just of plywood pieces that measure 2X4s and a couple of screws to knock out this plan to perfection. Apparently, these attractive shed shelves can also bring an all-new upheaval to your sense of creativity indeed. As you find quite a lot of compartments with this DIY styling technique, you will be able to store quite a lot of items here. The shelf doubles as a utility space and doubles as a great storage area too.

4. Get Hands-On with Storage Shelves Cum Attic Area

Get Hands-On with Storage Shelves Cum Attic Area

The shed area, as you can see, has a dedicated space for your attic storage because the bars that make up the ceiling shelf just have an added plywood shelf to make the attic storage area a durable one. Since there is more space, you can build a stand-alone cupboard for storing your other durables too. Therefore, the space can double up as a storage cum attic area. Similarly, look for products that fit into the attic shelves. To the space, add old beer or wine bottles and glasses that you no longer intend to use. This way, you can free up some of that space in your kitchen area. Since this arrangement almost serves as a built-in loft, you would not bang your head often. At the same time, it is easier to reach the attic shelf without using a ladder.

5. Explore the Concept Behind Rectangular Shelving

Explore the Concept Behind Rectangular Shelving

Here, you explore how to recreate an open-style pattern that has rectangular shelves. Since the shelves are rectangular in shape, you get a wider storage space. This is much better than cupboards with square shelves. Therefore, you can have more stuff stored under a rectangular shelving pattern. The shed shelves occupy the existing space in an efficient manner. Plywoods (2x4s) of eight inches each that are three in number form the horizontal spacing, while eight 1 X3s form the vertical shelves, followed by a single piece of 4 x 8 plywood. Therefore, you have three rectangular shelves that help you get an effective storage area in your garage or shed space.

6. Oriental Cubbies Unveil Magic

Oriental Cubbies Unveil Magic

Garden cubbies are oriental and great to look at. And these garden-style cubbies have shelves that can be customized according to the storage requirements of products you have on hand. Say, for instance, curiosity or lightweight articles can support the first two compartments. The third shelf can hold wine or champagne bottles, billboard bats, hockey sticks, and so on. Apparently, you can follow DIY tutorials so that you can provide your own style to the entire setting. Again, the cubbies can be customized using the same sizes or different size dimensions. This is more like a curio-styled cupboard we are looking at.

7. Recreate a Bicycle Garage that Looks Sturdy and Durable

Recreate a Bicycle Garage that Looks Sturdy and Durable

Inside the lovely shed, a paneled door has been done to convert the space into a bicycle garage. As you can see inside, there are two bicycles that have already been parked. Similarly, a scooter or a light-duty automobile can also occupy the shed spaces in a robust manner. Although another door has been constructed, it has been closed, and you can make storage shelves for your attic and lumber items here. A lovely overview of natural surroundings covers the shed area. When you keep the doors open, you allow natural lighting and ventilation to enter the premises. Overall, just by using home tools and easy-to-handle equipment, you can remodel the space into the lovely bicycle garage you are aiming for.

8. Discover a Multi-Functional Storage Area

 Discover a Multi-Functional Storage Area

The multi-purpose functional storage shed shelf that you are looking at is mind-blowing, isn’t it? This is because the designer has used wall mount hooks by which garden tools, equipment, and broomsticks have been hung up without creating partition shelves. Similarly, the storage spaces of the shed area are utilized efficiently mainly because a stand-alone metallic shelf has been put up inside the premises. And here, you find unutilized shelves and miscellaneous items that find their place here. Adjacent to the metallic shelf, you also find another table that has been put up on display, and you can also store some of your bulky things out here. Lastly, you have utilized a multitude of DIY techniques to store a great many things without spending too much time, effort, or money on renovating the place.

9. Wall-Mount Storage Boards Are in Vogue

 Wall-Mount Storage Boards Are in Vogue

For those of you who do not have the time or patience to get a cupboard or a shelf done from start to finish, here is an excellent DIY hack you can go in for. Here, all you have to do is put up a wall-mount storage board wherein you have hook spots available. You can hang your shovels, scissors, garden tapes, wires, and lot many more products in the available area. As a matter of fact, you utilize your storage spaces in a prudent fashion. At the same time, you are able to store quite a number of items without spending too much time or effort in looking for plywood, screws, or getting an actual cupboard done. Therefore, this is a DIY hack for those of you who are out on the go but require a quick-fix idea for getting a storage space built.

10. Enclosed Shed Areas for Weather Sensitive Decors

Enclosed Shed Areas for Weather Sensitive Decors

The enclosed storage area, as you already see it, is a shed facility that can be put to good use in quite a number of ways. This is because the enclosed space protects or safeguards your utility items from sun, rain, or hail storms. However, you may have beheaded plant perennials during the cold season and would want to replant those plants during the spring or summertime. Therefore, the need arises for these plants to be kept at a safe and secure location, and an enclosed shed area can be put to use with respect to the same. Similarly, you can store glass or wooden items that must be kept away from rain, heat, or dust. Furniture pieces, holiday lights, and other delicate items can also find their place in such enclosed storage areas.

11. Going in For a Barn-Styled Shed with Shelves

Going in For a Barn-Styled Shed with Shelves

Are you going to store your unused decorative items, seasonal tools, or even your backyard furniture pieces? Then, look no further when you can DIY a barn-styled shed with shelves and compartments in it. As you can see, this is a freshly painted cottage-styled barn that acts as a shed area and doubles up as a storage space. This is because you have cupboards with a roof or enclosure over it. Therefore, new cups, painted pottery, and other delicate items can be stored without getting exposed to dust, heat, or rain. A door is attached to the barn cottage, and you can close or open it as you want to store utilities or retrieve things from the same. Wall mount hooks have also been added wherein you hang shovels, axes, and other forms of gardening equipment.

12. Outdoor Sheds for Storing Firewood Logs

 Outdoor Sheds for Storing Firewood Logs

Creating a shed for storing your firewood logs can be quite fun and exciting. This is because taking out firewood pieces from a garage can be a daunting experience for most of us. Therefore, having an organized shed for storing the log pieces that make your winter firelit nights great is what you must be looking for. Inside a cottage-styled outdoor shed, you have firewood pieces that have neatly been stacked up. Building compartment shelves or adding labels can also make the process more streamlined. This way, you can access or retrieve firewood logs whenever you want without having the need to run up to your garage every single time.

Summing It Up

All in all, these 12 creative DIY shed shelves are recreated by using the utmost degree of ease. And DIY hacks or techniques on how the ideas can be executed to perfection have also been discussed at length.

By building effective storage spaces, you can turn unused barns or shed spaces for storing a variety of products that are over-crowing your homes. These include your unused furniture decor pieces, cable wires, appliances, sports equipment, and attic items.

Try Spray painting the premises or including wall tapestry stickers, and you can remodel the shed areas to an all-new high. This is because you use your creativity to add a multi-dimensional 3D effect to the areas that were otherwise looking boring or dull.

So, which is the favorite idea, you are going to incorporate with respect to shed shelving?

August 9, 2023 0 comments
0 FacebookTwitterPinterestEmail
Newer Posts
Older Posts

Recent Posts

  • A Complete Chalked Paint Review fo Better Selection 
  • A Guide to Painting Furniture without Sanding
  • 15 Steps to Create Faux Shiplap DIY Wall in Budget
  • How to Paint Furniture without Sanding or Priming
  • A Guide to Achieving Texture with Saltwash Paint Techniques

Recent Comments

No comments to show.

Recent Posts

  • A Complete Chalked Paint Review fo Better Selection 

    October 18, 2023
  • A Guide to Painting Furniture without Sanding

    October 18, 2023
  • 15 Steps to Create Faux Shiplap DIY Wall in Budget

    October 18, 2023
  • How to Paint Furniture without Sanding or Priming

    October 18, 2023
  • A Guide to Achieving Texture with Saltwash Paint Techniques

    October 18, 2023

Categories

  • Bathroom (15)
  • Bedroom (4)
  • Brush (3)
  • Decor & Design (15)
  • Decorating (1)
  • Dining Room (3)
  • DIY (2)
  • DIY Projects (11)
  • Door (5)
  • Fireplace (3)
  • Flooring (2)
  • Furniture (9)
  • Gardening (1)
  • Guide (11)
  • Home Crafts (1)
  • Home Decor (7)
  • Home Improvement (9)
  • Ideas (63)
  • Kitchen (16)
  • Outdoor Living (1)
  • Paints (18)
  • Review (1)
  • Room Ideas (3)
  • Tutorial (1)
  • Uncategorized (2)
  • Wall (6)

Instagram

About Us

Maecenas nec odio et ante tincidunt tempus. Donec vitae sapien ut libero venenatis faucibus, nullam quis.

01 Central Park, US, New York City
Phone: (012) 345 6789
Fax: (012) 345 6789

  • Facebook
  • Twitter

@2021 - All Right Reserved. Designed and Developed by PenciDesign


Back To Top
DormyHome
  • Decor & Design
  • DIY
  • Guide
  • Home Improvement
  • Smart Home